

Why You’ll Love This Cheesecake
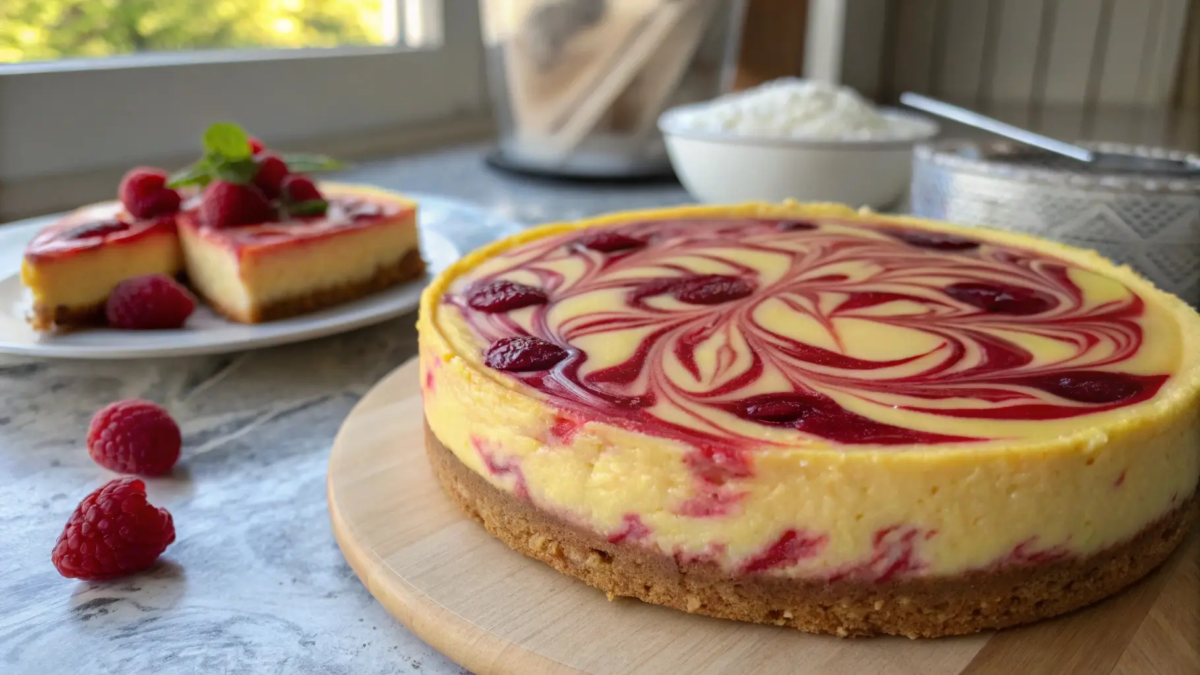
Imagine sinking your fork into a slice of creamy, dreamy lemon cheesecake with a burst of tangy raspberry swirls. Sounds divine, right? This Lemon Raspberry Swirl Cheesecake is the perfect combo of rich, zesty, and fruity flavors that’ll make your taste buds dance!
Not only is this cheesecake delicious, but it’s also a showstopper. Those gorgeous swirls of raspberry sauce make it look like something straight out of a bakery. But guess what? You don’t need to be a professional baker to make it!
If you’ve ever been intimidated by making cheesecake, don’t worry I’ll walk you through every step, from making the buttery crust to creating a perfect swirl (no fancy tricks required). Plus, I’ll spill the best tips to avoid cracks, soggy crusts, and overbaking disasters!
So, are you ready to impress your family and friends with the ultimate homemade Lemon Raspberry Swirl Cheesecake? Let’s get started
Table of Contents
Ingredients You’ll Need for the Best Lemon Raspberry Swirl Cheesecake
Before we jump into the baking magic, let’s go over everything you need. Quality ingredients make all the difference in cheesecake, so choose wisely!
Ingredient List & Quantities
| Ingredient | Quantity |
|---|---|
| For the Crust | |
| Graham cracker crumbs | 1 ½ cups (about 10 crackers) |
| Granulated sugar | 2 tablespoons |
| Melted butter | 5 tablespoons |
| For the Cheesecake Filling | |
| Cream cheese (softened) | 24 oz (3 blocks) |
| Granulated sugar | 1 cup |
| Sour cream | ½ cup |
| Eggs | 3 large |
| Lemon juice (fresh) | ¼ cup |
| Lemon zest | 1 tablespoon |
| Vanilla extract | 1 teaspoon |
| For the Raspberry Swirl | |
| Fresh raspberries | 1 cup |
| Granulated sugar | 3 tablespoons |
| Cornstarch | 1 teaspoon |
| Water | 2 tablespoons |
Pro Tip: Always use room-temperature ingredients for the best cheesecake texture!
Step-by-Step Guide to Making Lemon Raspberry Swirl Cheesecake
Alright, time to roll up your sleeves and get baking! Follow these simple steps for a fail-proof, bakery-worthy cheesecake.
Step 1: Preparing the Crust
The crust is the foundation of your cheesecake, and a good crust makes all the difference. Here’s how to make a buttery, crunchy graham cracker base:
- Crush the graham crackers – You can either blitz them in a food processor or crush them in a ziplock bag using a rolling pin. You need fine crumbs for the best texture.
- Mix the crumbs with melted butter and sugar – This helps bind the crust together and adds a touch of sweetness.
- Press the mixture into the bottom of a springform pan – Use the back of a spoon or a measuring cup to pack it down tightly. This prevents a crumbly crust!
- Pre-bake at 325°F (163°C) for 10 minutes – This keeps it from getting soggy later when you pour in the cheesecake filling.
Why Pre-Bake? This step ensures the crust stays crisp and doesn’t mix into the creamy filling.
Step 2: Making the Creamy Lemon Cheesecake Filling
Now for the star of the show – the rich, velvety cheesecake filling infused with zesty lemon goodness!
- Beat the cream cheese and sugar together – Use a hand or stand mixer at low speed to keep it smooth. Overmixing can trap air and cause cracks later.
- Add the sour cream, lemon juice, lemon zest, and vanilla extract – These ingredients add tanginess, flavor, and creaminess.
- Add the eggs one at a time – Mix each egg in gently. Be careful not to overbeat, or you’ll get a dense cheesecake.
- Pour the filling over the pre-baked crust – Smooth it out with a spatula.
Pro Tip: Always scrape the sides of your bowl while mixing to make sure everything is fully incorporated.
Step 3: Creating the Raspberry Swirl
This is where the magic happens! The raspberry swirl adds a pop of color and tangy flavor.
- Cook the raspberries, sugar, and cornstarch over medium heat – Stir continuously until the berries break down and the sauce thickens.
- Strain the mixture through a fine mesh sieve – This removes the seeds for a smooth swirl.
- Drop spoonfuls of raspberry sauce onto the cheesecake batter – Use a toothpick or knife to gently swirl it around for a marbled effect.
Swirling Tip: Don’t overdo it too much swirling can make the cheesecake look messy!
Step 4: Assembling and Baking the Cheesecake
Now it’s time to bake to perfection!
- Place the cheesecake in a water bath – Wrap the pan in foil and set it in a larger pan filled with 1 inch of hot water. This prevents cracks and ensures even baking.
- Bake at 325°F (163°C) for 50-60 minutes – The center should be slightly jiggly but set around the edges.
- Turn off the oven and let it cool inside with the door slightly open – Sudden temperature changes can cause cracks!
Don’t Rush It! A slow cool-down prevents a sunken or cracked cheesecake.
Step 5: Cooling and Chilling for the Best Texture
This is the hardest part waiting! But trust me, it’s worth it.
- Let the cheesecake cool completely at room temperature – At least 1 hour before moving it to the fridge.
- Refrigerate for at least 4-6 hours (preferably overnight) – This allows the flavors to develop and the texture to set.
Patience Pays Off! A well-chilled cheesecake slices beautifully and tastes even better the next day!
Common Problems and How to Fix Them
Even the best bakers run into cheesecake troubles now and then. But don’t worry I’ve got you covered! Here are some of the most common cheesecake problems and how to fix them like a pro.
1. Why Did My Cheesecake Crack?
Cracked cheesecake? It’s a baker’s worst nightmare! But it happens for a few reasons:
Overmixing the batter (traps air, leading to cracks)
Skipping the water bath (cheesecake needs gentle, even baking)
Overbaking (drying out causes cracks)
Rapid temperature changes (sudden cooling makes it shrink too fast)
How to Fix It
Use a water bath – This helps the cheesecake bake evenly.
Bake at a lower temperature – 325°F (163°C) is the sweet spot!
Let it cool slowly – Turn off the oven and crack the door open for 30 minutes.
Add a sour cream topping – If a crack happens, cover it up with a sweet, tangy topping!
Quick Fix: If your cheesecake cracks, spread a thin layer of whipped cream or fresh raspberries on top. No one will ever know!
2. How to Prevent a Soggy Crust
A soggy crust is a big no-no! If your graham cracker base turns mushy, the culprit is usually moisture from the filling or water bath.
How to Fix It
Pre-bake the crust for 10 minutes – This keeps it crisp.
Wrap the pan tightly in foil – Prevents water from leaking in.
Use a silicone pan liner – Keeps the crust dry while baking.
Pro Tip: If you still end up with a soggy crust, try making a cookie crust instead. Crushed shortbread or Oreos make a sturdier base!
3. My Raspberry Swirl Didn’t Turn Out Right – What Went Wrong?
Sometimes the swirl disappears or bleeds into the batter. Here’s why:
Raspberry sauce was too thin – It needs to be thick for a clear swirl.
Too much swirling – Overdoing it mixes the sauce into the batter.
Batter was too thick – A thick batter doesn’t let the swirl blend smoothly.
How to Fix It
✔️ Cook the raspberry sauce until thick – It should coat the back of a spoon.
✔️ Swirl gently with a toothpick – Less is more!
✔️ Layer the sauce properly – Drop small spoonfuls on top and swirl lightly.
Bonus Tip: For a super vibrant swirl, add a tiny drop of red food coloring to the raspberry sauce!
4. How to Avoid Overbaking or Underbaking
Cheesecake is tricky—you want it firm yet creamy. But how do you know when it’s just right?
How to Fix It
✔️ Do the “jiggle test” – The edges should be set, but the center should still jiggle slightly.
✔️ Check the temperature – A fully baked cheesecake should be 150°F (65°C) in the center.
✔️ Don’t rely on time alone – Ovens vary, so always check for doneness!
Fun Fact: Cheesecake keeps cooking even after you turn off the oven! That’s why slow cooling is key.
Tips for the Best Lemon Raspberry Swirl Cheesecake
Want to make the ultimate, bakery-style cheesecake at home? Follow these expert tips!
1. Choosing the Right Ingredients
Great cheesecake starts with great ingredients.
✔️ Use full-fat cream cheese – Low-fat versions won’t be as creamy.
✔️ Fresh lemon juice and zest – Bottled juice just won’t cut it!
✔️ Room temperature ingredients – Prevents lumps in the batter.
Pro Tip: If your cream cheese is too cold, microwave it for 10-15 seconds to soften it quickly!
2. The Secret to a Perfectly Smooth Cheesecake Filling
No one likes lumpy cheesecake! Here’s how to keep your filling velvety smooth.
✔️ Beat on low speed – Too much air = cracks.
✔️ Strain the batter – If you see lumps, run it through a fine-mesh sieve.
✔️ Scrape the bowl often – Make sure everything is fully mixed.
Pro Tip: Want an extra-silky texture? Blend the batter in a food processor instead of a mixer!
3. How to Get a Beautiful Swirl Every Time
Want those Pinterest-perfect swirls? Follow these tricks!
✔️ Thick raspberry sauce – A thin sauce disappears into the batter.
✔️ Use a skewer or knife – Gently swirl without overmixing.
✔️ Work in sections – Drop spoonfuls of sauce evenly around the cheesecake before swirling.
Pro Tip: A good swirl should look like marble, not a blended mess. Less is more!
Variations and Customization Ideas
Want to put your own twist on this cheesecake? Here are some fun variations!
1. Gluten-Free and Keto-Friendly Options
✔️ Use almond flour or crushed nuts instead of graham crackers.
✔️ Swap sugar for monk fruit or erythritol for a keto-friendly version.
✔️ Use full-fat Greek yogurt instead of sour cream for fewer carbs.
Bonus: A coconut flour crust also works great!
2. Using Different Fruits for the Swirl
Not a fan of raspberries? Try these instead!
✔️ Strawberries – Slightly sweeter and super vibrant.
✔️ Blueberries – Adds a rich, deep purple swirl.
✔️ Blackberries – A little tart but delicious!
Pro Tip: You can mix different berries for a multi-colored swirl!
3. Mini Cheesecakes and Cheesecake Bars
Want to make bite-sized treats instead of a full cheesecake? Try these:
✔️ Mini cheesecakes – Use a muffin tin with cupcake liners.
✔️ Cheesecake bars – Bake in a square pan and slice into bars.
✔️ No-bake version – Skip the oven and set in the fridge!
Fun Idea: Drizzle melted white chocolate on top for an extra fancy touch!
Let’s finish this ultimate Lemon Raspberry Swirl Cheesecake guide with all the tips you need to enjoy your masterpiece!
Serving and Storing Your Cheesecake
So, you’ve made this beautiful, creamy cheesecake, and now it’s time to slice and serve. But wait! There’s an art to this, too.
Best Ways to Serve Lemon Raspberry Swirl Cheesecake
Before you grab a knife, follow these tips for clean, picture-perfect slices:
✔️ Use a hot knife – Run a sharp knife under hot water, then dry it off before slicing.
✔️ Wipe the knife after each cut – This keeps your slices neat and clean.
✔️ Cut with a gentle sawing motion – Avoid pressing down too hard.Pro Tip: For extra-clean edges, dip your knife in hot water before every single cut!
What to Serve with Lemon Raspberry Swirl Cheesecake
This cheesecake is already amazing on its own, but if you want to take it to the next level, try these toppings:
Fresh Berries – Extra raspberries, strawberries, or blueberries for a pop of freshness.
Drizzle of Honey or Caramel – Adds a sweet contrast to the tartness.
Chocolate Shavings – Because chocolate makes everything better!
Whipped Cream – Light, fluffy, and the perfect finishing touch.Fun Idea: Serve with a cup of coffee or a glass of lemonade for a delightful pairing
How to Store and Freeze Cheesecake Properly
If you have leftovers (which is rare because it’s so good ), here’s how to store them without losing texture or flavor.
Refrigerating Cheesecake
✔️ Cover it with plastic wrap or foil – Prevents it from absorbing fridge odors.
✔️ Store in an airtight container – Keeps it fresh for 4-5 days.
✔️ Let it sit at room temperature for 10-15 minutes before serving – This brings back its creamy texture.Freezing Cheesecake
Want to save some for later? Cheesecake freezes beautifully!
1️⃣ Cool it completely before freezing – Never freeze a warm cheesecake!
2️⃣ Wrap it tightly in plastic wrap, then aluminum foil – This prevents freezer burn.
3️⃣ Freeze for up to 3 months – Just thaw overnight in the fridge before serving.Pro Tip: You can also freeze individual slices for easy grab-and-go desserts!
Frequently Asked Questions (FAQs)
Got cheesecake questions? I’ve got answers!
1. Can I Use Frozen Raspberries Instead of Fresh?
Yes! But thaw them first and drain any excess liquid before making the raspberry swirl. Otherwise, the extra moisture will make the sauce too runny.
2. Can I Make This Cheesecake Ahead of Time?
Absolutely! Cheesecake actually tastes better the next day because the flavors have time to develop. Just make it a day ahead, refrigerate it overnight, and serve when ready.
3. What If I Don’t Have a Springform Pan?
No worries! You can use a deep pie dish or a regular cake pan, but:
✔️ Line it with parchment paper for easy removal.
✔️ Grease the sides well so the cheesecake doesn’t stick.
✔️ Use a water bath carefully – No leaks!4. Can I Make This a No-Bake Cheesecake?
Yes! For a no-bake version, simply:
✔️ Use a graham cracker crust (chill it instead of baking).
✔️ Whip the cream cheese, sugar, lemon juice, and zest together.
✔️ Fold in whipped cream for structure.
✔️ Swirl in the raspberry sauce and refrigerate for at least 6 hours.No-bake cheesecakes are softer than baked ones but still deliciously creamy!
Conclusion: Enjoy Your Homemade Lemon Raspberry Swirl Cheesecake
And there you have it You’ve now mastered the art of making a flawless Lemon Raspberry Swirl Cheesecake from crafting a buttery crust to swirling in that gorgeous raspberry sauce.
This cheesecake is:
✅ Creamy, dreamy, and tangy
✅ Perfectly sweet with a fruity burst
✅ Great for special occasions (or just because!)Baking should be fun, not stressful! Follow these tips, and you’ll have bakery-quality cheesecake every time.
So, grab a slice, take a bite, and enjoy every creamy, lemony, raspberry-swirled moment!
Did You Enjoy This Guide? Let Me Know!
I’d love to hear how your cheesecake turns out! Drop a comment or share your experience especially if you tried a fun variation! Happy baking
Add a Comment