
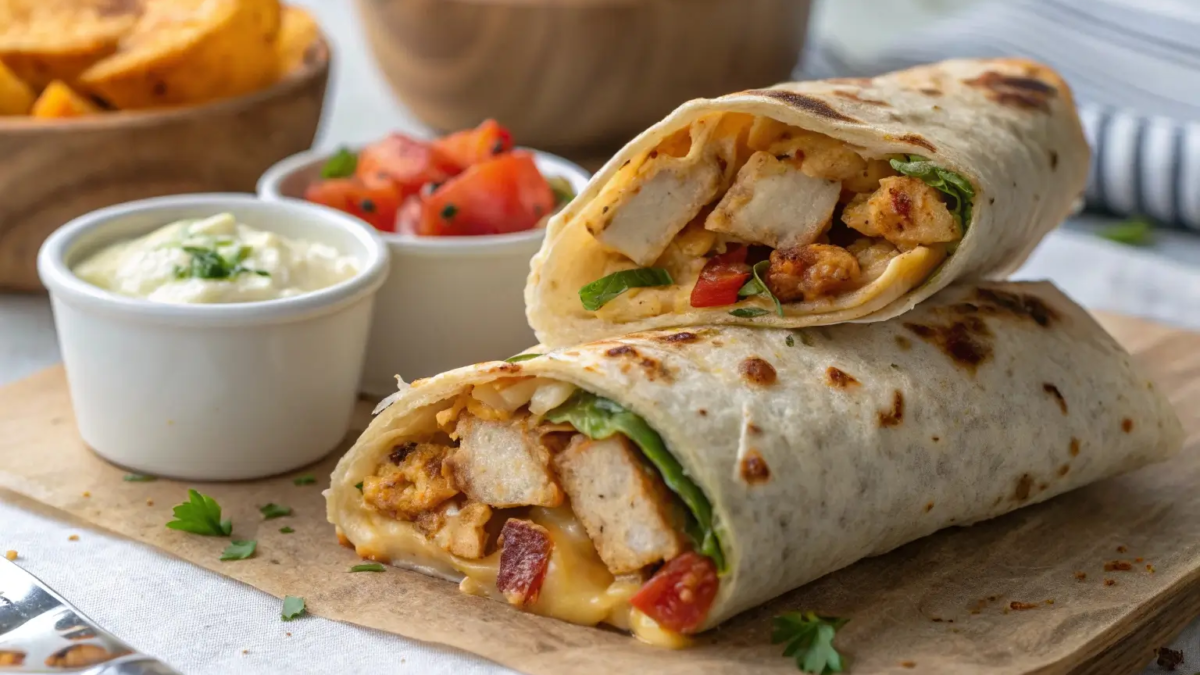
Who doesn’t love a warm, cheesy, garlicky bite wrapped up in a crispy tortilla? Cheesy Garlic Chicken Wraps are the ultimate comfort food a perfect balance of savory chicken, gooey cheese, and aromatic garlic, all wrapped up and toasted to perfection. Whether you need a quick lunch, an easy dinner, or a satisfying snack, these wraps hit the spot every time.
The best part? They’re super easy to make! You don’t need to be a pro in the kitchen to whip up these delicious wraps. Plus, you can customize them with different cheeses, sauces, and even spice levels to suit your taste.
But before we jump into the step-by-step recipe, let’s take a look at why these wraps are so irresistible
Table of Contents
Why These Wraps Are a Must-Try
Still wondering if Cheesy Garlic Chicken Wraps are worth making? Here’s why they deserve a spot on your menu:
✅ Fast & Easy: Ready in under 30 minutes perfect for busy days.
✅ Loaded with Flavor: A perfect mix of garlic, cheese, and juicy chicken.
✅ Crispy & Cheesy: The cheese melts beautifully, while the wrap gets golden and crispy.
✅ Great for Meal Prep: Make them ahead of time and enjoy later!
✅ Completely Customizable: Add veggies, spice, or extra garlic to suit your taste.
Now that we’re officially craving cheesy garlic goodness, let’s gather our ingredients and get cooking
Ingredients You’ll Need for the Best Cheesy Garlic Chicken Wraps
Before we start cooking, let’s make sure we have everything ready. Here’s a detailed ingredient breakdown:
📝 Ingredients List:
| Ingredient | Quantity | Notes |
|---|---|---|
| Chicken Breast | 2 medium (about 1 lb) | Can substitute with thighs or rotisserie chicken. |
| Garlic Cloves (minced) | 4 large | Fresh garlic for maximum flavor. |
| Shredded Cheese | 1 cup | Mozzarella, cheddar, or a blend. |
| Large Flour Tortillas | 4 | Can use whole wheat or gluten-free. |
| Olive Oil | 2 tablespoons | For cooking the chicken. |
| Butter | 1 tablespoon | Adds richness to the wrap. |
| Salt & Pepper | To taste | Enhances overall flavor. |
| Italian Seasoning | 1 teaspoon | Optional, but adds extra depth. |
| Red Pepper Flakes | ½ teaspoon (optional) | For a slight kick. |
💡 Pro Tip: If you love extra garlicky flavor, roast your garlic before adding it to the wrap!
Step-By-Step Cooking Instructions
Now, let’s turn these simple ingredients into a mouthwatering cheesy garlic chicken wrap! Follow these steps carefully to get the best texture and flavor.
Step 1: Prepping and Seasoning the Chicken
Before we start cooking, we need to prepare the chicken for maximum flavor.
1️⃣ Pat the chicken dry with a paper towel this helps it cook evenly.
2️⃣ Season generously with salt, pepper, and Italian seasoning.
3️⃣ Mince the garlic and set it aside. If you want extra garlic punch, use a garlic press to get a finer texture.
💡 Why is drying the chicken important? It prevents excess moisture, allowing the chicken to develop a nice golden sear instead of steaming!
Step 2: Cooking the Chicken
Now that our chicken is seasoned, let’s get it perfectly cooked.
1️⃣ Heat 1 tablespoon of olive oil in a skillet over medium-high heat.
2️⃣ Add the chicken breasts and cook for 5-6 minutes per side until golden brown and cooked through.
3️⃣ Lower the heat to medium-low, add minced garlic, and sauté for 30 seconds until fragrant.
4️⃣ Remove the chicken from the pan and let it rest for 5 minutes before slicing into thin strips.
“Letting the chicken rest before cutting it helps retain all those delicious juices, making it extra tender!”
Step 3: Assembling the Wrap
Now for the fun part building our cheesy garlic chicken wrap
1️⃣ Place a large tortilla on a clean surface.
2️⃣ Sprinkle a handful of shredded cheese in the center.
3️⃣ Add the sliced garlic-infused chicken on top.
4️⃣ Optionally, sprinkle a pinch of red pepper flakes for extra heat.
5️⃣ Fold in the sides, then roll it up tightly like a burrito.
💡 Pro Tip: To prevent the wrap from unrolling, press it firmly and let it sit for a minute before toasting!
Step 4: Toasting the Wrap to Perfection
A warm, crispy tortilla with gooey, melted cheese inside? Yes, please!
1️⃣ Heat 1 tablespoon of butter in a pan over medium heat.
2️⃣ Place the assembled wrap seam-side down in the pan.
3️⃣ Cook for 2-3 minutes per side, pressing gently with a spatula until golden and crispy.
4️⃣ Once done, transfer to a cutting board and let it cool slightly before slicing.
“Toasting the wrap not only melts the cheese beautifully but also gives it that perfect golden crunch!”
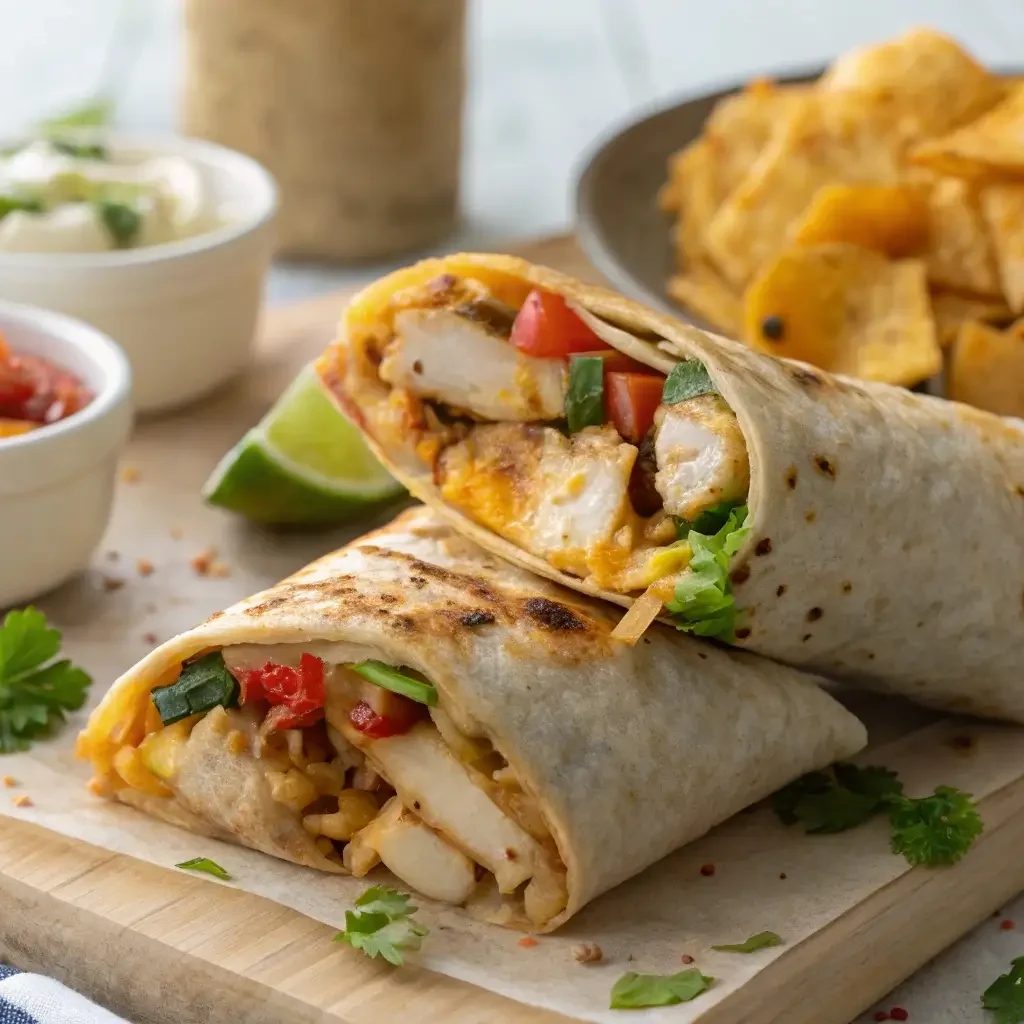
Step 5: Serve and Enjoy
And just like thatyour Cheesy Garlic Chicken Wraps are ready to be devoured! Cut them in half, serve with your favorite dipping sauces, and enjoy the crispy, cheesy, garlicky goodness.
Common Problems and How to Fix The
Cooking Cheesy Garlic Chicken Wraps should be easy, but sometimes things don’t go as planned. If you’ve ever ended up with a soggy wrap, dry chicken, or cheese that just won’t melt, don’t worry I’ve got the solutions!
1. Why Is My Wrap Soggy? Preventing a Mushy Wrap
A soggy wrap is the ultimate mood killer. Instead of a crispy, golden wrap, you end up with a wet, floppy mess. What went wrong?
Solution:
✔️ Don’t overstuff the wrap. Too much filling makes it harder to seal properly, allowing moisture to escape.
✔️ Drain excess moisture. If your chicken is extra juicy, let it rest on a paper towel before adding it to the wrap.
✔️ Toast at the right temperature. Cooking on medium heat ensures the outside crisps up without burning.
✔️ Use a dry pan instead of oil or butter if you want an ultra-crispy finish.
“A great wrap is all about balance too much moisture, and it gets soggy. Too little, and it falls apart!”
2. How to Avoid Dry or Overcooked Chicken
Dry chicken is the worst chewy, tough, and completely unappetizing. Luckily, avoiding this mistake is super easy.
Solution:
✔️ Don’t overcook the chicken. Chicken breasts cook quickly, so 5-6 minutes per side on medium heat is enough.
✔️ Let the chicken rest. Resting the chicken for 5 minutes before slicing helps retain its juices.
✔️ Use chicken thighs instead of breasts for extra moisture.
✔️ Marinate or brine your chicken before cooking to lock in moisture.
💡 Pro Tip: If your chicken is already dry, toss it in a little olive oil or butter before adding it to the wrap it brings back moisture and flavor!
3. The Cheese Isn’t Melting Properly – What to Do?
Cheese is the star of the show in Cheesy Garlic Chicken Wraps, so if it’s not melting right, we’ve got a problem.
Solution:
✔️ Use a cheese blend mozzarella melts beautifully, while cheddar adds sharpness.
✔️ Shred your own cheese. Pre-shredded cheese has anti-caking agents that prevent smooth melting.
✔️ Cover the pan with a lid for a minute while toasting it traps heat and helps melt the cheese faster.
✔️ Layer cheese on both sides of the wrap for maximum meltiness
“When in doubt, add more cheese there’s no such thing as too much gooey goodness
4. My Wrap Falls Apart! How to Roll and Seal It Like a Pro
If your wrap unfolds or spills everywhere, it’s time to perfect your rolling technique!
Solution:
✔️ Warm the tortilla slightly before rolling it makes it more flexible.
✔️ Don’t overfill the wrap. Too much stuffing makes it harder to seal properly.
✔️ Tuck in the sides tightly, then roll firmly. Think of it like rolling a burrito!
✔️ Use melted cheese as a “glue” a little melted cheese on the edge helps keep the wrap sealed.
“A well-rolled wrap is like a good hug it’s firm, snug, and holds everything together perfectly!”
5. Making the Garlic Flavor Stand Out Without Overpowering the Dish
Garlic is amazing, but too much of it can overpower everything else. How do you get the perfect garlic balance?
Solution:
✔️ Use roasted garlic instead of raw for a mellow, slightly sweet flavor.
✔️ Mix fresh and powdered garlic fresh for boldness, powder for depth.
✔️ Saute garlic in butter before adding it to the wrap it mellows out the sharpness.
✔️ Pair garlic with lemon juice or fresh herbs to balance the flavor.
Variations and Customizations for Every Diet
Want to make Cheesy Garlic Chicken Wraps fit your diet? Here’s how to tweak them for keto, vegetarian, gluten-free, and spicy versions!
Making It Low-Carb or Keto-Friendly
Cutting carbs? No worries! You can still enjoy Cheesy Garlic Chicken Wraps with these tweaks:
✔️ Swap flour tortillas for low-carb or almond flour tortillas.
✔️ Use lettuce wraps instead for an ultra-light version.
✔️ Skip the flour tortilla and turn this into a cheesy garlic chicken bowl!
✔️ Use full-fat cheese for a more satisfying meal.
Turning It into a Vegetarian Delight
Want a meat-free version? Try this:
✔️ Replace chicken with grilled mushrooms, tofu, or chickpeas.
✔️ Add spinach or roasted bell peppers for extra flavor.
✔️ Use vegan cheese to make it dairy-free.
✔️ Swap butter for olive oil for a completely plant-based wrap.
Spicy, Smoky, or Sweet? Flavor Enhancements to Try
Want to amp up the flavors? Try these ideas!
Spicy: Add sriracha, jalapeños, or cayenne pepper.
Smoky: Use smoked paprika or chipotle powder.
Sweet & Savory: Drizzle honey or balsamic glaze over the chicken.
What to Serve with Cheesy Garlic Chicken Wraps
These wraps are delicious on their own, but pairing them with the right side dish or dip takes them to another level!
The Best Dipping Sauces
Dips make everything better! Try these options:
✔️ Garlic Aioli – A creamy, garlicky dream.
✔️ Ranch Dressing – Cool, tangy, and classic.
✔️ Honey Mustard – Sweet and tangy contrast.
✔️ Buffalo Sauce – For those who love heat!
🍽️ Perfect Side Dishes
Want a complete meal? Serve your wraps with:
Side Salad: A simple Caesar or Greek salad.
Fries: Regular, sweet potato, or zucchini fries.
Guacamole or Avocado Slices: A creamy, refreshing contrast.
Grilled Corn on the Cob: Adds a smoky-sweet touch.
“The best sides are the ones that balance flavors think fresh, crunchy, or creamy!”
Meal Prep and Storage Tips
One of the best things about Cheesy Garlic Chicken Wraps is that they’re perfect for meal prep! Whether you’re making them ahead of time or storing leftovers, following these tips will help you keep them fresh, flavorful, and crispy.
How to Make These Wraps Ahead of Time
If you’re a meal prepper, you’ll love how easy it is to prep these wraps in advance. Here’s how to do it right:
1️⃣ Cook the chicken in advance. Store it in an airtight container in the fridge for up to 4 days.
2️⃣ Grate the cheese ahead of time. Freshly shredded cheese melts better!
3️⃣ Chop the garlic early. Store it in a sealed container to keep it fresh.
4️⃣ Assemble the wraps, but don’t toast them yet. Wrap them in foil or plastic wrap and store them in the fridge for up to 2 days.
💡 Pro Tip: If you’re meal-prepping for the week, store the components separately and assemble the wraps fresh. This prevents them from getting soggy
How to Store Leftovers Properly
Got extra wraps? No problem! Storing them correctly ensures they stay fresh and delicious.
📌 Storing in the Refrigerator:
✔️ Allow the wraps to cool completely before storing.
✔️ Wrap them individually in foil or parchment paper to keep them from drying out.
✔️ Store in an airtight container in the fridge for up to 3 days.
📌 Freezing for Long-Term Storage:
✔️ If freezing, skip toasting the wraps. Toast them fresh when you’re ready to eat!
✔️ Wrap each assembled (but untoasted) wrap in plastic wrap, then place in a zip-top freezer bag.
✔️ Store in the freezer for up to 2 months.
💡 Pro Tip: Label your wraps with the date before freezing, so you know how fresh they are
The Best Way to Reheat for That Freshly Made Taste
Want your wraps to taste as good as the first time? Here’s how to reheat them properly without making them soggy.
Reheating on the Stovetop (Best Method!)
✔️ Heat a dry pan over medium heat.
✔️ Place the wrap seam-side down and press gently.
✔️ Cook for 2-3 minutes per side until crispy and warm.
Reheating in the Oven (For Multiple Wraps)
✔️ Preheat the oven to 350°F (175°C).
✔️ Wrap the wraps loosely in foil and bake for 10-12 minutes.
Reheating in the Microwave (Quickest Option)
✔️ Place the wrap on a microwave-safe plate.
✔️ Cover with a damp paper towel to keep moisture in.
✔️ Microwave for 30-45 seconds, flipping halfway through.
Pro Tip: The microwave is not the best for maintaining crispiness, but it works if you’re in a hurry. If possible, reheat on a stovetop or air fryer for the best texture
Frequently Asked Questions (FAQ)
Still have some questions? Here are some common FAQs about Cheesy Garlic Chicken Wraps!
1. Can I Use Rotisserie Chicken Instead?
Absolutely! Rotisserie chicken is a huge time-saver and adds extra flavor. Just shred it and toss it with garlic and seasoning before adding it to your wrap.
✔️ Bonus: This is a great way to use up leftover chicken!
2. What’s the Best Way to Make This Extra Crispy?
Want that golden, crunchy wrap every time? Try these tricks:
✔️ Use a dry pan instead of oil to toast the wrap.
✔️ Cook on medium heat to avoid burning.
✔️ Press the wrap down with a spatula while toasting.
✔️ For extra crispiness, brush a little melted butter on the outside before toasting.
3. Can I Make These Wraps Without Cheese?
Of course! If you’re dairy-free or just don’t like cheese, try these options:
✔️ Use vegan cheese alternatives.
✔️ Add mashed avocado or hummus for creaminess.
✔️ Skip cheese completely and load up on extra garlic and seasoning for flavor.
4. Can I Make These Wraps in an Air Fryer?
Yes! Air fryers make Cheesy Garlic Chicken Wraps extra crispy without extra oil.
✔️ Preheat the air fryer to 375°F (190°C).
✔️ Place the wrap seam-side down in the basket.
✔️ Air fry for 4-5 minutes, flipping halfway through.
“Air frying gives you that golden crunch with less oil perfect for a healthier twist!”
Final Thoughts – Why You’ll Love This Recipe Again and Again
Let’s wrap things up (pun intended ) with a quick recap of why Cheesy Garlic Chicken Wraps are a must-try recipe:
✔️ Quick & Easy: Less than 30 minutes from start to finish.
✔️ Crispy, Cheesy, and Garlicky: The ultimate comfort food combo.
✔️ Customizable: Add veggies, spice, or different cheeses to switch it up.
✔️ Meal-Prep Friendly: Make ahead, store, and reheat easily.
Whether you’re making them for lunch, dinner, or a snack, these wraps are guaranteed to be a hit with your family and friend
Add a Comment